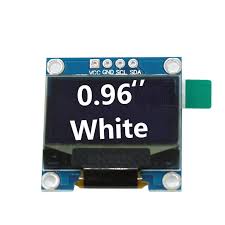
Description

- Color: white
- Driving Chip: SSD1306
Pin Definition:
- GND: power ground
- VCC: power positive (2.8-5.5V)
- SCL: Serial Clock Line
- SDA: Serial Data Line
- Interface Type: SPI, I2C
Getting started with the White 0.96″ I2C 128X64 OLED LCD Display Module
This article shows how to use the SSD1306 0.96 inch I2C OLED display with the Arduino. We’ll show you some features of the OLED display, how to connect it to the Arduino board, and how to write text
Step1: Hardware required
- Arduino UNO or NodeMCU ESP8266
- OLED
- Jumper wire
Step2: Connecting the Hardware

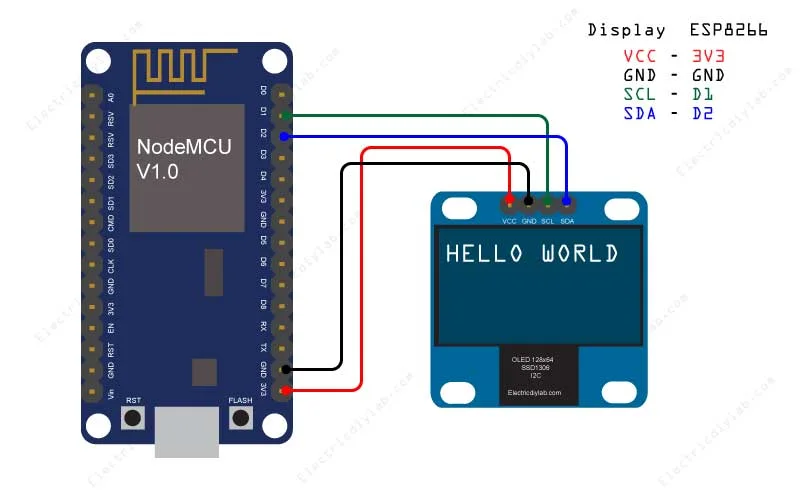
If you’re using other Arduino board rather than the uno, check out what are their SCL and SDA pins.
- Nano: SDA (A4); SCL(A5);
- MEGA: SDA (20); SCL(21);
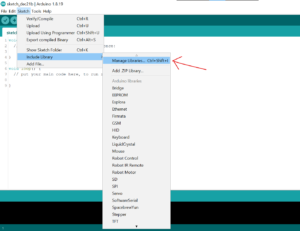
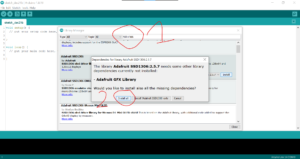
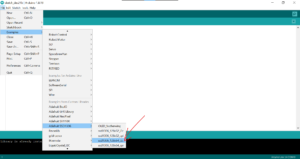
Step3: Setting up the library
To control the OLED display you’ll need the “adafruit_GFX” library and the “adafruit_SSD1306” library. You can find both of this in Manage Libraries.
Another Option:
Installing the adafruit_GFX library
- Click here to download the adafruit GFX library. You should have a .zip folder in your Downloads folder
- Unzip the .zip folder and you should get Adafruit-GFX-Library-master folder
- Move the Adafruit_GFX_Library folder to your Arduino IDE installation libraries folder
Installing the adafruit_SSD1306 library
- Click here to download the adafruit_SSD1306 library. You should have a .zip folder in your Downloads folder
- Unzip the .zip folder and you should get Adafruit_SSD1306-master folder
- Move the Adafruit_SSD1306 folder to your Arduino IDE installation libraries folder
- Finally, re-open your Arduino IDE
Step4: Upload the sample sketch
You can find an example scketch for testing the display.
Edit line 35 and change
0x3D
to
0x3C
and upload the code to either NodeMCU or UNO.
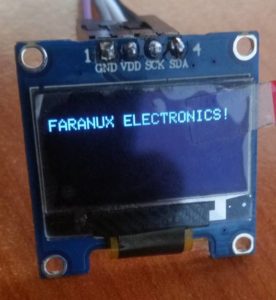
You can use also the following sketch which displays “FARANUX ELECTRONICS” message in the OLED display.
#include <Wire.h>
#include <Adafruit_GFX.h>
#include <Adafruit_SSD1306.h>

#define SCREEN_WIDTH 128 // OLED display width, in pixels
#define SCREEN_HEIGHT 64 // OLED display height, in pixels

// Declaration for an SSD1306 display connected to I2C (SDA, SCL pins)
Adafruit_SSD1306 display(SCREEN_WIDTH, SCREEN_HEIGHT, &Wire, -1);

void setup() {
Serial.begin(115200);

if(!display.begin(SSD1306_SWITCHCAPVCC, 0x3C)) { // Address 0x3D for 128x64
Serial.println(F("SSD1306 allocation failed"));
for(;;);
}
delay(2000);
display.clearDisplay();

display.setTextSize(1);
display.setTextColor(WHITE);
display.setCursor(0, 10);
// Display static text
display.println("FARANUX ELECTRONICS!");
display.display();
}

void loop() {
}
Step5: Testing the circuit
After uploading the code, this is what you’ll get in your OLED:
If your OLED display is not showing anything:
- Check that the OLED display is properly wired to the Arduino
- Double-check the OLED display I2C address: with the OLED connected to the Arduino, upload this code and check the I2C address in the Serial Monitor
You should change the OLED address in the following line, if necessary. In our case, the address is 0x3C.
if(!display.begin(SSD1306_SWITCHCAPVCC, 0x3C)) { Package includes: 1×Monochrome 0.96 Inch I2C 128X64 OLED Display

Reviews
There are no reviews yet.