Description
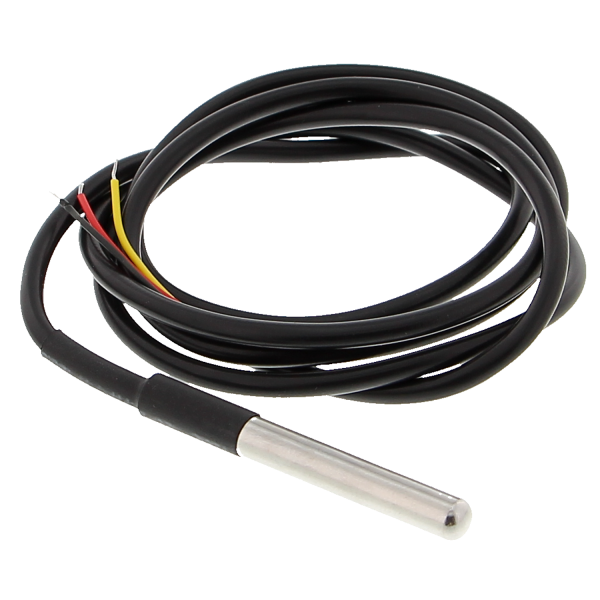
This is a pre-wired and waterproofed version of the DS18B20 sensor. Handy for when you need to measure something far away, or in wet conditions. While the sensor is good up to 125°C the cable is jacketed in PVC so we suggest keeping it under 100°C.
Features
- Stainless steel tube 6mm diameter by 30mm long
- Cable is 36″ long / 91cm, 4mm diameter
- Contains DS18B20 temperature sensor
- If your sensor has four wires – Red connects to 3-5V, Black connects to ground and White is data. The copper wire is soldered to the wire shielding
- If your sensor has three wires – Red connects to 3-5V, Blue/Black connects to ground and Yellow/White is data
DS18B20 Technical specs:
- Usable temperature range: -55 to 125°C (-67°F to +257°F)
- 9 to 12 bit selectable resolution
- Uses 1-Wire interface- requires only one digital pin for communication
- Unique 64 bit ID burned into chip
- Multiple sensors can share one pin
- ±0.5°C Accuracy from -10°C to +85°C
- Temperature-limit alarm system
- Query time is less than 750ms
- Usable with 3.0V to 5.5V power/data
Getting started with the Waterproof Digital Thermal Probe or Sensor DS18B20 DS18B20 Arduino Sensor
In this example, you’ll read the temperature using the DS18B20 sensor and the Arduino, and the values will be displayed on the Arduino Serial Monitor.
Hardware required
- Arduino UNO
- Breadboard
- Waterproof Digital Probe or Sensor DS18B20 arduino Sensor
- 4.7k ohm resistor
- Jumper wires
Connecting the Hardware
Assemble all the parts by following the schematics below.
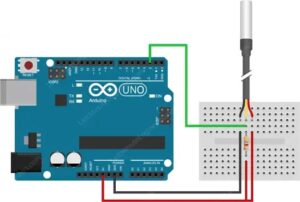
Code
You’ll need to install the OneWire Library and DallasTemperature Library.
Installing the OneWire Library
- Click here to download the OneWire library. You should have a .zip folder in your Downloads
- Unzip the .zip folder and you should get OneWire-master folder
- Rename your folder from
OneWire-masterto OneWire - Move the OneWire folder to your Arduino IDE installation libraries folder
- Finally, re-open your Arduino IDE
Installing the DallasTemperature Library
- Click here to download the DallasTemperature library. You should have a .zip folder in your Downloads
- Unzip the .zip folder and you should get Arduino-Temperature-Control-Library-master folder
- Rename your folder from
Arduino-Temperature-Control-Library-masterto DallasTemperature - Move the DallasTemperature folder to your Arduino IDE installation libraries folder
- Finally, re-open your Arduino IDE
After installing the needed libraries, upload the following code to your Arduino board.
// Include the libraries we need

#include <OneWire.h>

#include <DallasTemperature.h>

// Data wire is plugged into port 2 on the Arduino

#define ONE_WIRE_BUS 2

// Setup a oneWire instance to communicate with any OneWire devices (not just Maxim/Dallas temperature ICs)

OneWire oneWire(ONE_WIRE_BUS);

// Pass our oneWire reference to Dallas Temperature.

DallasTemperature sensors(&oneWire);

/*

 * The setup function. We only start the sensors here

 */

void setup(void)

{

  // start serial port

  Serial.begin(9600);

  Serial.println("Dallas Temperature IC Control Library Demo");

  // Start up the library

  sensors.begin();

}

/*

 * Main function, get and show the temperature

 */

void loop(void)

{

  // call sensors.requestTemperatures() to issue a global temperature

  // request to all devices on the bus

  Serial.print("Requesting temperatures...");

  sensors.requestTemperatures(); // Send the command to get temperatures

  Serial.println("DONE");

  delay(1500);

  // After we got the temperatures, we can print them here.

  // We use the function ByIndex, and as an example get the temperature from the first sensor only.

  float tempC = sensors.getTempCByIndex(0);

  // Check if reading was successful

  if (tempC != DEVICE_DISCONNECTED_C)

  {

    Serial.print("Temperature for the device 1 (index 0) is: ");

    Serial.println(tempC);

  }

  else

  {

    Serial.println("Error: Could not read temperature data");

  }

}
Finally, you should open the Arduino IDE serial monitor at a 9600 baud rate and you’ll see the temperature displayed.

