Description
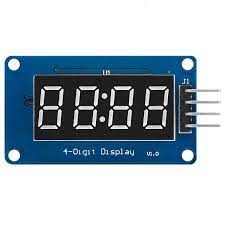
This 7 segment LED Display has 4 digits which are controlled by TM1637 Driver Chip. It requires only two connections to control this TM1637 4 Bits Digital Tube LED Display Module. Also thanks to the I2C Bus you can control it using only 2 wires, leaving more pins available on your MicroController to connect other things.
The module is a 12-foot clock with four common anode tube (0.36 inch) display module for driver IC TM1637, only two signal lines can make the MCU control four 7-segment digital tubes.
There are several modules using this TM1637 chip to form a 4 digit numerical display module.
Pinout Description :
There is a 4-pin right angle male header on the module for making connections.

CLK is a clock input pin. Connect to any digital pin on Arduino.
DIO is a Data I/O pin. Connect to any digital pin on Arduino.
VCC pin supplies power to the module. Connect it to the 3.3V to 5V power supply.
GND is a ground pin.
Features :
- Ease to use.
- Ease of multiplexing.
- Can use as a 4 digit display unit.
- Can use as a clock display.
- DIY clock project.
- 4 digit display unit.
- Electrical/Electronic projects.
- The counter project using 7 segment display.
- 4 M2 screws positioning holes for easy installation
Getting started with the TM1637 4-Digit 7-Segment Display
In this tutorial, you will learn how you can control TM1637 4-digit 7-segment displays with Arduino Program for displaying counting from 0-9999. These displays are fantastic for displaying sensor data, temperature, time, etc.
Hardware required
- Arduino Uno
- Jumper wires Male to Female
- TM1637 4-Digit 7-Segment Display
Connecting the Hardware
Hooking up the TM1637 to an Arduino is super simple. You only need to connect four wires: two for power and other the two for controlling the display. The module is powered safely from the 5-volt output of the Arduino. The CLK and DIO pins are connected to the Arduino’s digital pins 2 and 3 respectively. Below is the hookup for the experiments with the TM1637:

None of the pins used on the Arduino are critical because the module does not require any pin-specific features, so if you want to use different pins you can do so safely. Just be sure to change the pin numbers in the code to reflect any changes to the wiring.
Library Installation
To install the library, you can download it as a .zip from GitHub here. Next, go to Sketch > Include Library > Add .ZIP Library… in the Arduino IDE.
Upload the sample sketch
#define clk 2
#define data 3
uint8_t digits[] = { 0x3f, 0x06, 0x5b, 0x4f, 0x66, 0x6d, 0x7d, 0x07, 0x7f, 0x6f };
void setup()
{
pinMode(clk, OUTPUT);
pinMode(data, OUTPUT);
start();
writeValue(0x8f); // for changing the brightness (0x88-DIM 0x8f-Bright)
stop();
// clear display
//write(0x06, 0x5b, 0x4f, 0x00);
}
void loop()
{
for(int j=0;j<10000;j++)
{
write(digits[j/1000], digits[(j%1000)/100], digits[((j%1000)%100)/10], digits[j%10]);
delayMicroseconds(50);
}
}
void start(void)
{
digitalWrite(clk,HIGH);//send start signal to TM1637
digitalWrite(data,HIGH);
delayMicroseconds(5);
digitalWrite(data,LOW);
digitalWrite(clk,LOW);
delayMicroseconds(5);
}
void stop(void)
{
digitalWrite(clk,LOW);
digitalWrite(data,LOW);
delayMicroseconds(5);
digitalWrite(clk,HIGH);
digitalWrite(data,HIGH);
delayMicroseconds(5);
}
void write(uint8_t first, uint8_t second, uint8_t third, uint8_t fourth)
{
start();
writeValue(0x40);
stop();
start();
writeValue(0xc0);
writeValue(first);
writeValue(second);
writeValue(third);
writeValue(fourth);
stop();
}
bool writeValue(uint8_t value)
{
for(uint8_t i = 0; i < 8; i++)
{
digitalWrite(clk, LOW);
delayMicroseconds(5);
digitalWrite(data, (value & (1 << i)) >> i);
delayMicroseconds(5);
digitalWrite(clk, HIGH);
delayMicroseconds(5);
}
// wait for ACK
digitalWrite(clk,LOW);
delayMicroseconds(5);
pinMode(data,INPUT);
digitalWrite(clk,HIGH);
delayMicroseconds(5);
bool ack = digitalRead(data) == 0;
pinMode(data,OUTPUT);
return ack;
}
RESULTS
TM1637 4-Digit 7-Segment starts counting from 0 to 9999.


