Description
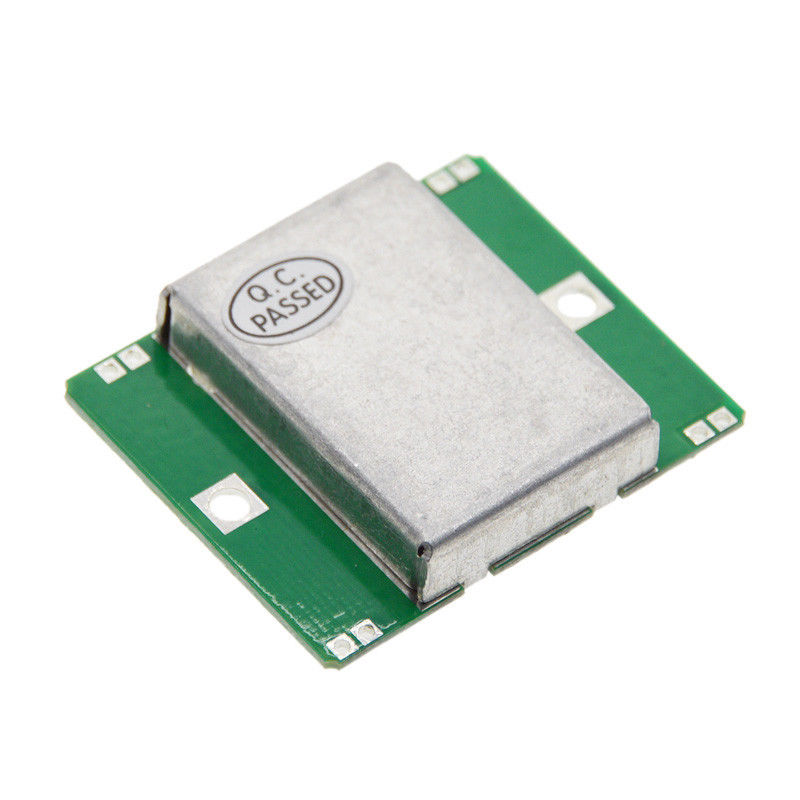
Getting started with the HB100 Microwave Doppler Radar Detector Probe Wireless Sensor Module
The HB100 Microwave sensor uses doppler radar to detect moving objects using microwaves. This differs from the method used by a regular infrared (IR) sensor as the microwave is sensitive to a variety of objects that can reflect it’s wavefpr,, and its sensor readings are not affected by ambient temperatures. This type of sensor is widely used in industrial, transportation and civil applications such as measuring a vehicle’s speed, measuring liquid levels, automatic door motion detection, automatic washing, production line material detection, car reversing sensors,
Signal Processing
The following diagram demonstrates the working principle of the sensor module. It works by amplifying a tiny signal which is received by the microwave sensor, and then through the comparison circuit it converts the signal into a square signal with a digital output of 0 or 1 which an Arduino or other micro controller can easily handle. 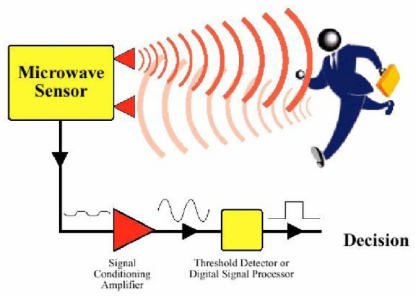
Signal Detection Range
Detection Angle: The angle of detection is 72 degrees with the antenna in a parallel direction (azimuth) The vertical (pitch) direction of the antenna is 36 degrees. 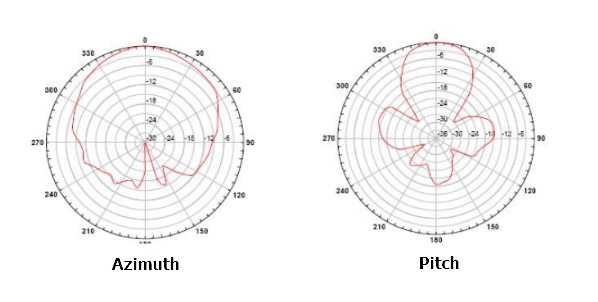
Hardware required
Connecting the Hardware
| HB100 Microwave Sensor | Arduino Uno |
| GND | GND |
| VCC | 3.3V OR 5V |
| IF | D2 |
LED to D13
Setting up the library
so before readin the RFID card tag we must have the library, so you can download it here . install the library by extracting that zipped file in the library folder as shown below

Upload the sample sketch
#include <MsTimer2.h> //Timer interrupt function library
int pbIn = 0; // Define interrupt 0 that is digital pin 2
int ledOut = 13; // Define the indicator LED pin digital pin 13
int number=0; //Interrupt times
volatile int state = LOW; // Defines the indicator LED state, the default is not bright
void setup()
{
Serial.begin(9600);
pinMode(ledOut, OUTPUT);//
attachInterrupt(pbIn, stateChange, FALLING); // Set the interrupt function, interrupt pin is digital pin D2, interrupt service function is stateChange (), when the D2 power change from high to low , the trigger interrupt.
MsTimer2::set(1000, Handle); // Set the timer interrupt function, running once Handle() function per 1000ms
MsTimer2::start();//Start timer interrupt function
}
void loop()
{
Serial.println(number); // Printing the number of times of interruption, which is convenient for debugging.
delay(1);
if(state == HIGH) //When a moving object is detected, the ledout is automatically closed after the light 2S, the next trigger can be carried out, and No need to reset. Convenient debugging.
{
delay(2000);
state = LOW;
digitalWrite(ledOut, state); //turn off led
}
}
void stateChange() //Interrupt service function
{
number++; //Interrupted once, the number + 1
}
void Handle() //Timer service function
{
if(number>1) //If in the set of the interrupt time the number more than 1 times, then means have detect moving objects,This value can be adjusted according to the actual situation, which is equivalent to adjust the threshold of detection speed of moving objects.
{
state = HIGH;
digitalWrite(ledOut, state); //light led
number=0; //Cleare the number, so that it does not affect the next trigger
}
else
number=0; //If in the setting of the interrupt time, the number of the interrupt is not reached the threshold value, it is not detected the moving objects, Cleare the number.
}
RESULT
When the microwave sensor does not detect moving objects, the indicator LED remains off. When the sensor detects moving objects, the LED will turn on and the output level will be change from HIGH to LOW. The LED will automatically turn off about after 0.5s and the output level will change from LOW to HIGH. If the microwave sensor detects continuously moving objects the LED will keep flashing on and off. The output level will fluctuate between HIGH and LOW until the object stops moving.


Reviews
There are no reviews yet.