Description
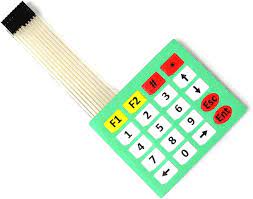
This 4×5 Matrix Array 20 Key Membrane Switch Keypad Keyboard high-quality soft-touch feeling button keypad with 100 million life-stroke lifespans and good resistance to environmental conditions.
This 20-button keypad provides a useful human interface component for microcontroller projects. Convenient adhesive backing provides a simple way to mount the keypad in a variety of applications.
Features :
- Ultra-thin design & adhesive backing provides easy integration to any project
- Excellent price-performance ratio
- Easy communication with any microcontroller
- 5 pins 2.54mm pitch connector, 4×5 type 20 keys.
- The sticker can peel off for adhesive mounting.
- Used widely in industrial and home electronic equipment, instrument, etc.
- This allows a microcontroller to ‘scan’ the 9 output pins to see which of the 20 buttons is being pressed.
Specification

Getting started with the 20 Key Membrane Switch Keypad Keyboard 4×5 Matrix Array
We are going to show how to connect a 4×5 Matrix Array 20 Key Membrane to an Arduino.
Step1: Hardware required
- Arduino Uno
- 4×5 Matrix Array 20 Key Membrane
Step2: Connecting the Hardware
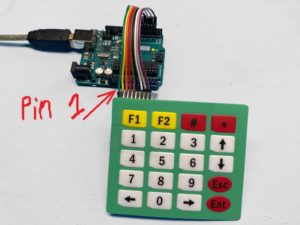
The connections are pretty straightforward. Start by connecting pin 1 of keypad to digital pin 10 on Arduino. Now keep on connecting the pins leftwards like 2 with 9, 3 with 8 etc.
Step3: Upload the Code
First downoad keypad.h library here.
#include <Keypad.h>
const byte ROWS = 5; //5 rows
const byte COLS = 4; //4 columns
char* specialKeys[] ={
"*", "#", "F2", "F1",
"UP", "3", "2", "1",
"DOWN", "6", "5", "4",
"ESC", "9", "8", "7",
"ENTER", "RIGHT", "0", "LEFT"
};char specialKeysID[] = {
'A', 'B', '#', '*',
'1', '2', '3', 'C',
'4', '5', '6', 'D',
'7', '8', '9', 'E',
'F', '0', 'G', 'H'
};char keys[ROWS][COLS] = {
{specialKeysID[0], specialKeysID[1], specialKeysID[2], specialKeysID[3]},
{specialKeysID[4], specialKeysID[5], specialKeysID[6], specialKeysID[7]},
{specialKeysID[8], specialKeysID[9], specialKeysID[10], specialKeysID[11]},
{specialKeysID[12], specialKeysID[13], specialKeysID[14], specialKeysID[15]},
{specialKeysID[16], specialKeysID[17], specialKeysID[18], specialKeysID[19]}
};

byte rowPins[ROWS] = {2,3,4,5,6}; //connect to the row pinouts of the kpd
byte colPins[COLS] = {7,8,9,10}; //connect to the column pinouts of the kpd

Keypad keypad = Keypad( makeKeymap(keys), rowPins, colPins, ROWS, COLS );

unsigned long loopCount;
unsigned long startTime;
String msg;

void setup() {
// 5x4 keypad test
Serial.begin(9600);
Serial.println("FARANUX ELECTRONICS");
}

void loop() {
// 5x4 keypad test
char key = keypad.getKey();
// just print the pressed key

if (key){
Serial.print(getKey(key));
}
if(getKey(key) =="ENTER")
{
Serial.println("ENTER is pressed");
}

//5x4 keypad detecting string value
} // End loop

/*
* getKey()
* @brief gets the actual key value from single character
* @param k is character
* @return returns acualt key value
* on May 06, 2020 at 19:37 in Ajax, Ontario, Canada
*/
char* getKey(char *k)
{
//5x4 keypad detecting string value
for(int i=0; i<20; i++)
{
if(specialKeysID[i] ==k) return specialKeys[i];
}

}//getKey
Package includes:
1×20 Key Membrane Switch Keypad Keyboard

